CFG Construction via Recursive Disassembly of ELF Binaries
Introduction
In this post, we will discuss ELF binaries, Disassembly algorithms
and Control flow graph construction. We will create a simple program
that can produce the control flow graph of an ELF binary using recursive
traversal disassembly.
A Brief
Introduction to Disassembly Algorithms
When given a series of bytes, the simplest disassembly method is
linear disassembly, which processes one instruction after another.
However, it assumes all bytes in the executable section are code,
ignoring the fact that data may be interspersed. This can lead to
misinterpreting data as code and producing incorrect results.
To address this, we use recursive traversal. Starting from a known
valid instruction (e.g., the program entry point), we follow only
instructions that are actually reachable during execution. When a jump
(e.g., jmp) is encountered, recursive disassembly follows the jump
target rather than continuing linearly, ensuring that only valid control
paths are analyzed.
1
2
3
4
5
6
7
8
9
10
11
_start:
    ; Some valid instructions
    mov eax, 1        ; Instruction 1
    jmp skip          ; Jump to skip label

    ; This is data, not code
    db 0xaa, 0xbb, 0xcc   ; Data

skip:
    mov ebx, 2        ; Instruction 2
    int 0x80          ; System call (exit)
In this example, linear disassembly will attempt to disassemble the
bytes following the jmp skip instruction, including the data (0xaa,
0xbb, 0xcc). However, with recursive traversal, the disassembler will
skip over the data and instead focus on disassembling the target of the
jmp skip instruction, ensuring it follows the correct
control flow.
Control Flow Graph
A Control Flow Graph (CFG) represents the possible execution paths a
program might take. Each node in the graph corresponds to a basic
block—a sequence of instructions that are executed sequentially, with
control entering only at the beginning and exiting only at the end. The
edges between nodes indicate how control can flow from one basic block
to another. CFG captures the structure of a program's execution and is a
valuable tool for analysis.
Consider a simple program as follows:
1
2
3
4
5
6
7
8
9
10
11
12
13
14
#include<stdio.h>
intmain(){ int x; scanf("%d",&x);
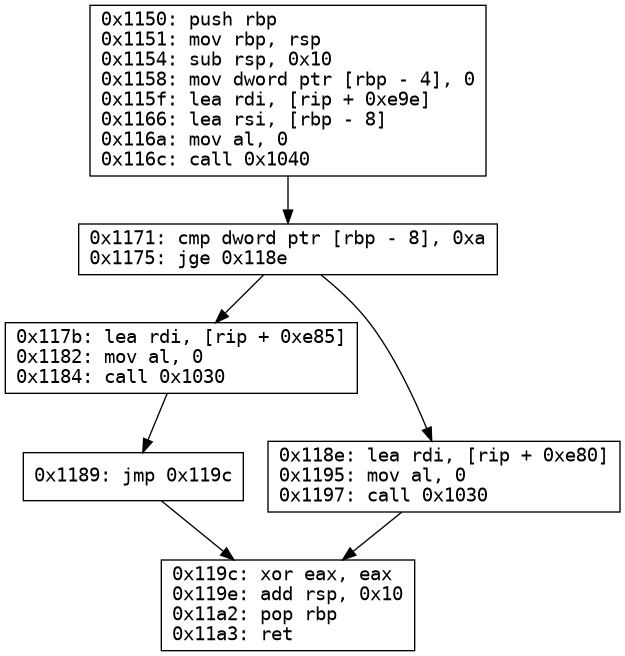
if(x<10){ printf("less than 10\n"); } else{ printf("greater than 10\n"); } return0; }
The control flow graph of the above program will be as follows
We will now write a simple program to disassemble functions of an ELF
binary to generate control flow graph. We will use capstone engine to
decode the instructions for us and then apply recursive traversal to
construct a control flow graph.
ELF Symbols
Before we are able to construct the CFG of a function, we need to be
able to locate where it begins. Fortunately, elf files store this
information in the form of Symbols. Symbols are entries in a symbol
table that represent functions, variables, or other identifiers used
during linking or debugging.
An ELF file can contain a maximum of two symbol tables -
.symtab and .dynsym
.symtab contains all global symbol references while
.dynsym contains all the symbols needed for dynamic
linking. Note: In stripped binaries, .symtab is stripped
but .dynsym cannot be stripped as it is needed for dynamic
linking.
.symtab has a corresponding .strtab section
that contains null terminated name of the symbol. Similarly,
.dynsym has .dynstr section that contains null
terminated string name of the symbol.
1
2
3
4
5
6
7
8
typedefstruct { Elf64_Word st_name; // Index into the string table unsignedchar st_info; // Type and binding attributes unsignedchar st_other; // Visibility Elf64_Half st_shndx; // Section index Elf64_Addr st_value; // Value of the symbol (e.g., address) Elf64_Xword st_size; // Size of the symbol } Elf64_Sym;
Here is how we can extract the symbols.
parse the ELF header to extract the section headers.
iterate over all section headers to find section headers with type
SHT_SYMTAB and SHT_DYNSYM
the corresponding .strtab or .dynstr
section can be found using the sh_link field of these
section headers
for each symbol, we can index into the string table (index is stored
in st_name field of symbol struct) to extract name of
symbol
Here is a simple helper function to extract symbols
// Determine if symbol is executable (in code section) if (s.section_index <= header->e_shnum) { section = section_headers[s.section_index]; s.executable = (section.sh_flags & SHF_EXECINSTR) ? 1 : 0; }
// Add the symbol to our results symbols.push_back(s); } }
return symbols; }
Now that we have all the symbols, we can begin disassembling all
symbols marked as executable.
Recursive Traversal
Disassembly
We consider each function as a series of Blocks. In compiler design,
program analysis, and reverse engineering, a basic block is a
fundamental concept that represents a sequence of instructions with
specific properties:
Single Entry Point: Execution can only enter the basic block through
its first instruction.
Single Exit Point: Execution can only leave the basic block from its
last instruction.
Sequential Execution: All instructions within a basic block are
executed sequentially with no branching in between.
exportCFGToDOT is just a helper function that converts
the recovered CFG into a convenient DOT format. We will discuss it
later. The most important function is
disassemble_function_recursive. Here is how it works.
We start from the function entry point and disassemble all
instructions that are executed in sequence. This constitutes one block,
which ends whenever we encounter a instruction that transfers or alter
control flow like call, ret, jmp
etc. The target of the control flow transfer is added as a successor of
this block and it's address is stored to be disassembled in further
iterations. Hence, everytime we disassemble block, we also add its
successor/successors as a target for further disassembly. This ensures
we only disassemble valid and reachable code. This is the essence of the
recursive traversal disassembly.
Before disassembling a block from a given address, we must check two
important conditions:
1 Previously Disassembled:
The address may have already been disassembled as part of a
previously visited block. In that case, we can safely skip it to avoid
redundant work.
2 Address Lies Inside an Existing Block:
The address might fall within the middle of an already disassembled
block (let’s call it Block A). Since every address we consider is a
potential control flow target, this suggests that execution might enter
Block A at this point — even though it's not the original entry of that
block. This is problematic, as a well-formed basic block must have only
one entry point. To resolve this, we must split Block A at the given
address into two separate blocks: one ending just before the address,
and the other starting from it.
The Algorithm
In other words, we maintain two sets:
pending_addresses: A worklist of addresses yet to be
processed processed_block_starts: Addresses already
examined to avoid reprocessing
Starting from the function's entry point, we
construct the control flow graph (CFG) using a worklist-based
traversal. The process is as follows:
Initialization
Begin by inserting the function's entry point into the
pending_addresses set.
Traversal Loop
While pending_addresses is not empty:
Take and remove the first address from the set.
If the address has already been processed (i.e., it exists in
processed_block_starts), skip it.
Check if the address lies within an already disassembled block but
not at its start:
This indicates that control flow is entering the middle of
a block, which violates CFG rules.
In such cases, the original block should be split at that point to
form a valid block.
Otherwise, disassemble a new basic block starting at this address
using disassemble_block.
Add the new block to the function.blocks map.
For each successor of the block:
Add it to pending_addresses to be processed later.
If the successor already exists, update its list of
predecessors.
Post-processing
After all reachable blocks are disassembled, perform a second pass:
Iterate over all blocks and for each block, update the
predecessors of its successors.
This is needed because if we disassemble a block A with successor B.
It is possible that successor B has not been disassembled yet and hence
we will not be able to add A to the predecessor of B at that point.
Hence we do it in the end, when all blocks have been disassembled.
This approach ensures that we capture all reachable instructions in a
function and build a valid, complete control flow graph. To visualize a
case where we need to split the block, consider the case below:
1
2
3
4
5
6
7
8
9
10
11
12
13
14
15
16
17
18
#include<iostream>
intmain(){ int x; std::cin>> x;
if(x>=100){ std::cout<<"Enter a number less than 100\n"; return1; }
while(x<100){ std::cout<<"The current iteration is "<<x<<"\n"; x++; }
return0; }
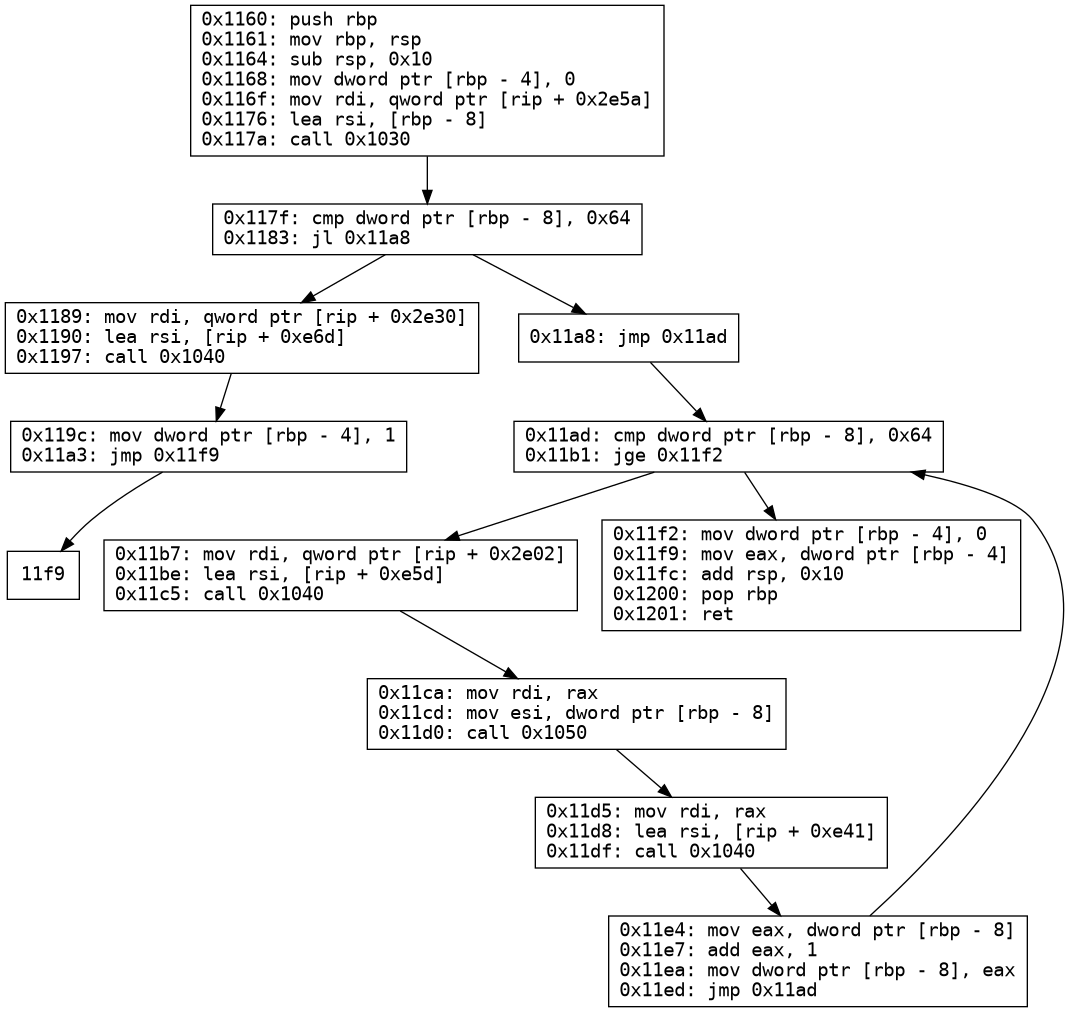
This is how the CFG looks without the split block logic
Notice how there is an abrupt jump to 0x11f9 which is
the second instruction of block 0x11f2. This means control
flow is entering block in the middle. Hence to correct this, we must
create a new block starting from 0x11f9.
voiddisassemble_function_recursive(csh handle, ELFFile &elfFile, Function &function, uint64_t start_address) { // Addresses that need to be processed std::set<uint64_t> pending_addresses; // Addresses that have already been processed std::set<uint64_t> processed_block_starts;
// Initialize with the function's entry point pending_addresses.insert(start_address);
// Continue until all reachable code is discovered while (!pending_addresses.empty()) { // Get the next address to process uint64_t current_address = *pending_addresses.begin(); pending_addresses.erase(pending_addresses.begin());
// Skip already processed addresses to avoid cycles if (processed_block_starts.count(current_address) > 0) { continue; }
// Mark this address as processed processed_block_starts.insert(current_address);
// Check if this address is in the middle of an existing block bool found_in_block = false; uint64_t containing_block_addr; for (constauto &[block_addr, block] : function.blocks) { if (current_address > block.start_address && current_address < block.end_address) { // We found that this address is inside an existing block found_in_block = true; containing_block_addr = block_addr; break; } }
if (found_in_block) { // Split the existing block at current_address Block new_block = split_block(function, containing_block_addr, current_address);
// Add the new block to the function function.blocks[current_address] = new_block;
// Process all successors of the new block for (uint64_t succ : new_block.successors) { // Update predecessor information for the successor blocks if (function.blocks.count(succ) > 0) { function.blocks[succ].predecessors.insert(current_address); }
// Add successor address to be processed pending_addresses.insert(succ); } continue; }
// Disassemble a new block starting at current_address Block block = disassemble_block(handle, elfFile, current_address);
// Only add the block if it contains valid instructions if (!block.instructions.empty()) { // Add the block to the function function.blocks[block.start_address] = block;
// Process all successors of this block for (uint64_t succ : block.successors) { // Update predecessor information for the successor blocks if (function.blocks.count(succ) > 0) { function.blocks[succ].predecessors.insert(block.start_address); }
// Add successor address to be processed pending_addresses.insert(succ); } } }
// Final pass to ensure all predecessor information is consistent for (auto &[addr, block] : function.blocks) { for (uint64_t succ : block.successors) { if (function.blocks.count(succ) > 0) { function.blocks[succ].predecessors.insert(block.start_address); } } } }
// create a new block at the point where control flow is entering new_block.start_address = split_address; //end_address of new block is same as end_address of original block new_block.end_address = original_block.end_address;
// find the instruction index size_t split_idx = 0; while (split_idx < original_block.instructions.size() && original_block.instructions[split_idx].address < split_address) { split_idx++; }
// copy all instructions from the splitting point over to the new block for (size_t i = split_idx; i < original_block.instructions.size(); i++) { new_block.instructions.push_back(original_block.instructions[i]); }
// remove all instructions after the splitting point from the original block original_block.instructions.resize(split_idx);
if (!original_block.instructions.empty()) // This should never be empty as we are assuming control flow is entering at a point other than first instruction. Hence one instruction must remain atleast after splitting. { // update original block end address Instruction &last_instr = original_block.instructions.back(); original_block.end_address = last_instr.address + last_instr.size; } else { original_block.end_address = split_address; }
// set successors of new block to be same as successors of original_block new_block.successors = original_block.successors;
//original block only has one successor now -> new_block original_block.successors.clear(); original_block.successors.insert(split_address);
// new_block as one predecessor -> original_block new_block.predecessors.insert(block_addr);
return new_block; }
The important part is that we only consider successors of a block for
disassembly by adding them to pending_addresses. This
ensures we only disassemble reachable code.
Let us now consider the disassemble_block function. It
has a much simpler task. Disassemble each instruction sequentially until
it encounters a block ending instruction i.e instructions that transfer
control flow from one block to another. These include return, jumps,
call, hlt etc.
We have collected all blocks of a function along with its successors
and predecessors. For visualization we can convert this to the DOT file
format. DOT is a text-based format that defines the structure and
appearance of the graph elements nodes, edges, labels, etc. It is used
by the Graphviz software.
Here is an example
1
2
3
4
5
6
7
8
9
10
11
12
13
14
15
16
digraph CFG { node [shape=box fontname="Courier"]; // Set all nodes to box shape and monospaced Courier font
// Define node A with alabel showing two assembly instructions "A" [label="A: push rbp\lmov rbp, rsp\l"];
// Define node B with alabel showing a call instruction "B" [label="B: call C\l"];
// Define node C with alabel showing a return instruction "C" [label="C: ret\l"];
// Define directed edges representing control flow between the nodes "A" -> "B"; "B" -> "C"; }
And here is how we take our blocks and convert them to dot format
voidexportCFGToDOT(const std::map<uint64_t, Block> &blocks, const std::string &filename) { std::ofstream out(filename + ".dot"); if (!out.is_open()) { std::cerr << "Failed to open file for CFG output.\n"; return; }
out << "digraph CFG {\n"; out << " node [shape=box fontname=\"Courier\"];\n";
for (constauto &[addr, block] : blocks) { std::stringstream label; //construct a label with all instructions along with their address for (constauto &instr : block.instructions) { label << "0x" << std::hex << instr.address << ": " << instr.mnemonic << " " << instr.op_str << "\\l"; } // construct a node along with the label out << " \"" << std::hex << block.start_address << "\" [label=\"" << label.str() << "\"];\n"; }
// construct edges between block and its successors for (constauto &[addr, block] : blocks) { for (uint64_t succ : block.successors) { out << " \"" << std::hex << block.start_address << "\" -> \"" << std::hex << succ << "\";\n"; } }
out << "}\n"; out.close(); std::cout << "CFG exported to " << filename << ".dot\n"; }
That completes our CFG parser. We can easily convert DOT files to PNG
using dot -Tpng ./file.dot -o ./file.PNG
Let us take a look at some results.
Results
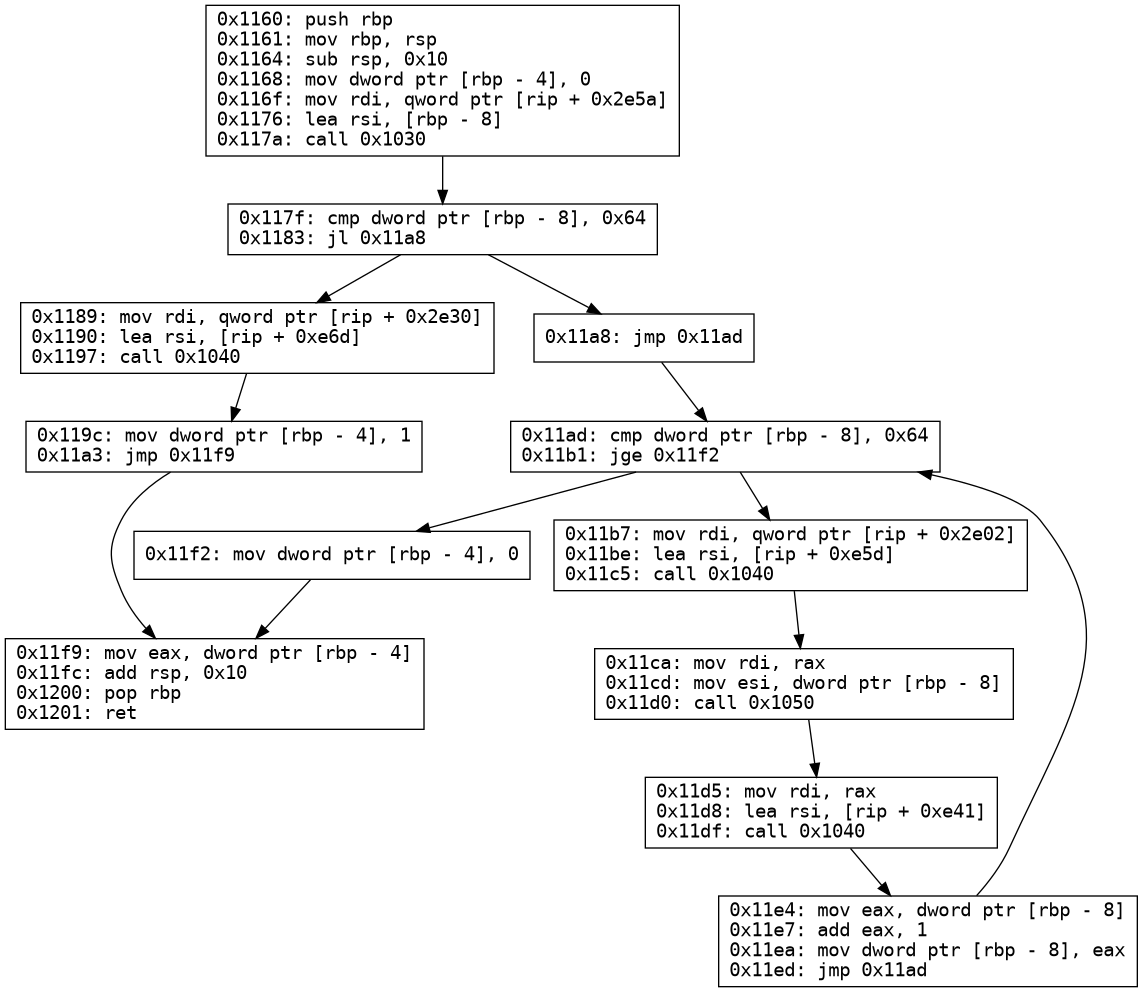
In the previous example, we skipped splitting the block. Let us now
look at the correct CFG for the program.
1
2
3
4
5
6
7
8
9
10
11
12
13
14
15
16
17
18
#include<iostream>
intmain(){ int x; std::cin>> x;
if(x>=100){ std::cout<<"Enter a number less than 100\n"; return1; }
while(x<100){ std::cout<<"The current iteration is "<<x<<"\n"; x++; }
return0; }
Control flow graph of main
function
Conclusion
In this blog post, we explored how to construct the Control Flow
Graph (CFG) of a program using Recursive Traversal disassembly. CFGs are
powerful tools for understanding program execution and analyzing how
control moves between different parts of a program.
I hope you found this post insightful and informative. Feel free to
reach out to me on X with any
comments or feedback.
You can find the accompanying source code for this post on my GitHub repository.