Control Flow Flattening using LLVM Pass
Introduction
I've been having fun coding a control flow flattening LLVM pass that obfuscates the control flow of a program. In this blog post, we will discuss control flow flattening, LLVM Passes and how LLVM passes can be used to automate control flow flattening. I also plan on covering other forms of obfuscations using LLVM passes in upcoming blog posts.
Some basics
Since this is a post on control flow flattening using LLVM passes, I recommend you become familiar with basics of LLVM and LLVM passes. LLVM for Grad Students is an excellent place to start. You can find more introductory LLVM blog posts in the References section.
In short, LLVM passes are used to analyse and transform IR from one
form to another. Optimization passes are used to optimize the IR and
make it more efficient. Analysis passes like dot-cfg are
used to analyse the program. We can write custom passes to perform our
own optimization/obfuscation/analysis and that is exactly what we are
going to do.
Note: The entire code for this project can be found here https://github.com/MrRoy09/llvm-control-flow-flatten
Control Flow Flattening
From Wikipedia:
Control flow (or flow of control) is the order in which individual statements, instructions or function calls of an imperative program are executed or evaluated.
Control flow analysis, in reverse engineering, is vital to understanding the behaviour of program. In a program, the complexity of control flow is usually linear with respect to the number of instruction blocks. Hence,static analysis can reveal a lot about the control flow of a program. Control flow obfuscation seeks to increase the complexity of control flow and make it harder to statically analyse and determine the control flow of the program. To achieve this, we will be taking the approach outlined in the paper
OBFUSCATING C++ PROGRAMS VIA CONTROL FLOW FLATTENING
I will describe the algorithm in brief. The basic idea is to
encompass all the blocks as cases within a
switch statement (or a switch like construct) and replicate
the original control flow using a dispatch variable that controls which
block will be executed next. This control variable can be modified at
the end of each case to control the next case
to be executed. The simplest example is as follows
Entry Block -> Block 1 ->
Block 2 can be transformed into Entry Block
-> Switch Statement -> Block 1 ->
Switch Statement -> Block 2.
Notice how in the transformed example, both Block 1 and
Block 2 will be at the same level relative to one another
(Both are under a Switch statement) whereas in the control
flow of the original program, Block 2 resides below
Block 1. This is why this technique is called control flow
flattening as it seeks to bring all the blocks at the same level
relative to one another. Another example is as follows. Suppose we have
a program
1 | |
We can convert this into
1 | |
Using LLVM opt we can generate a graph of the control
flow. Here is how the CFG (control flow graph) looks for
the above two programs
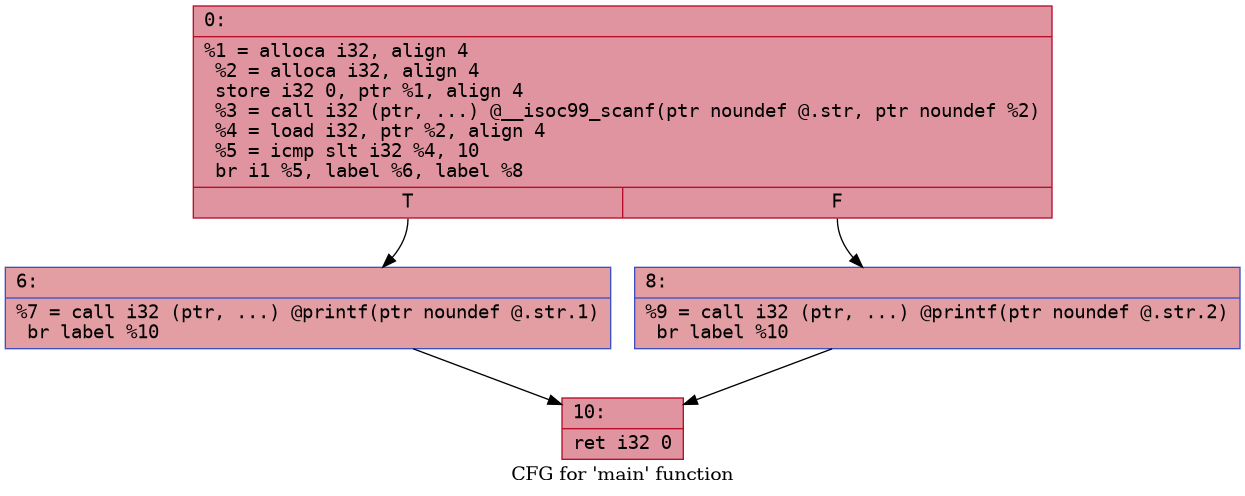
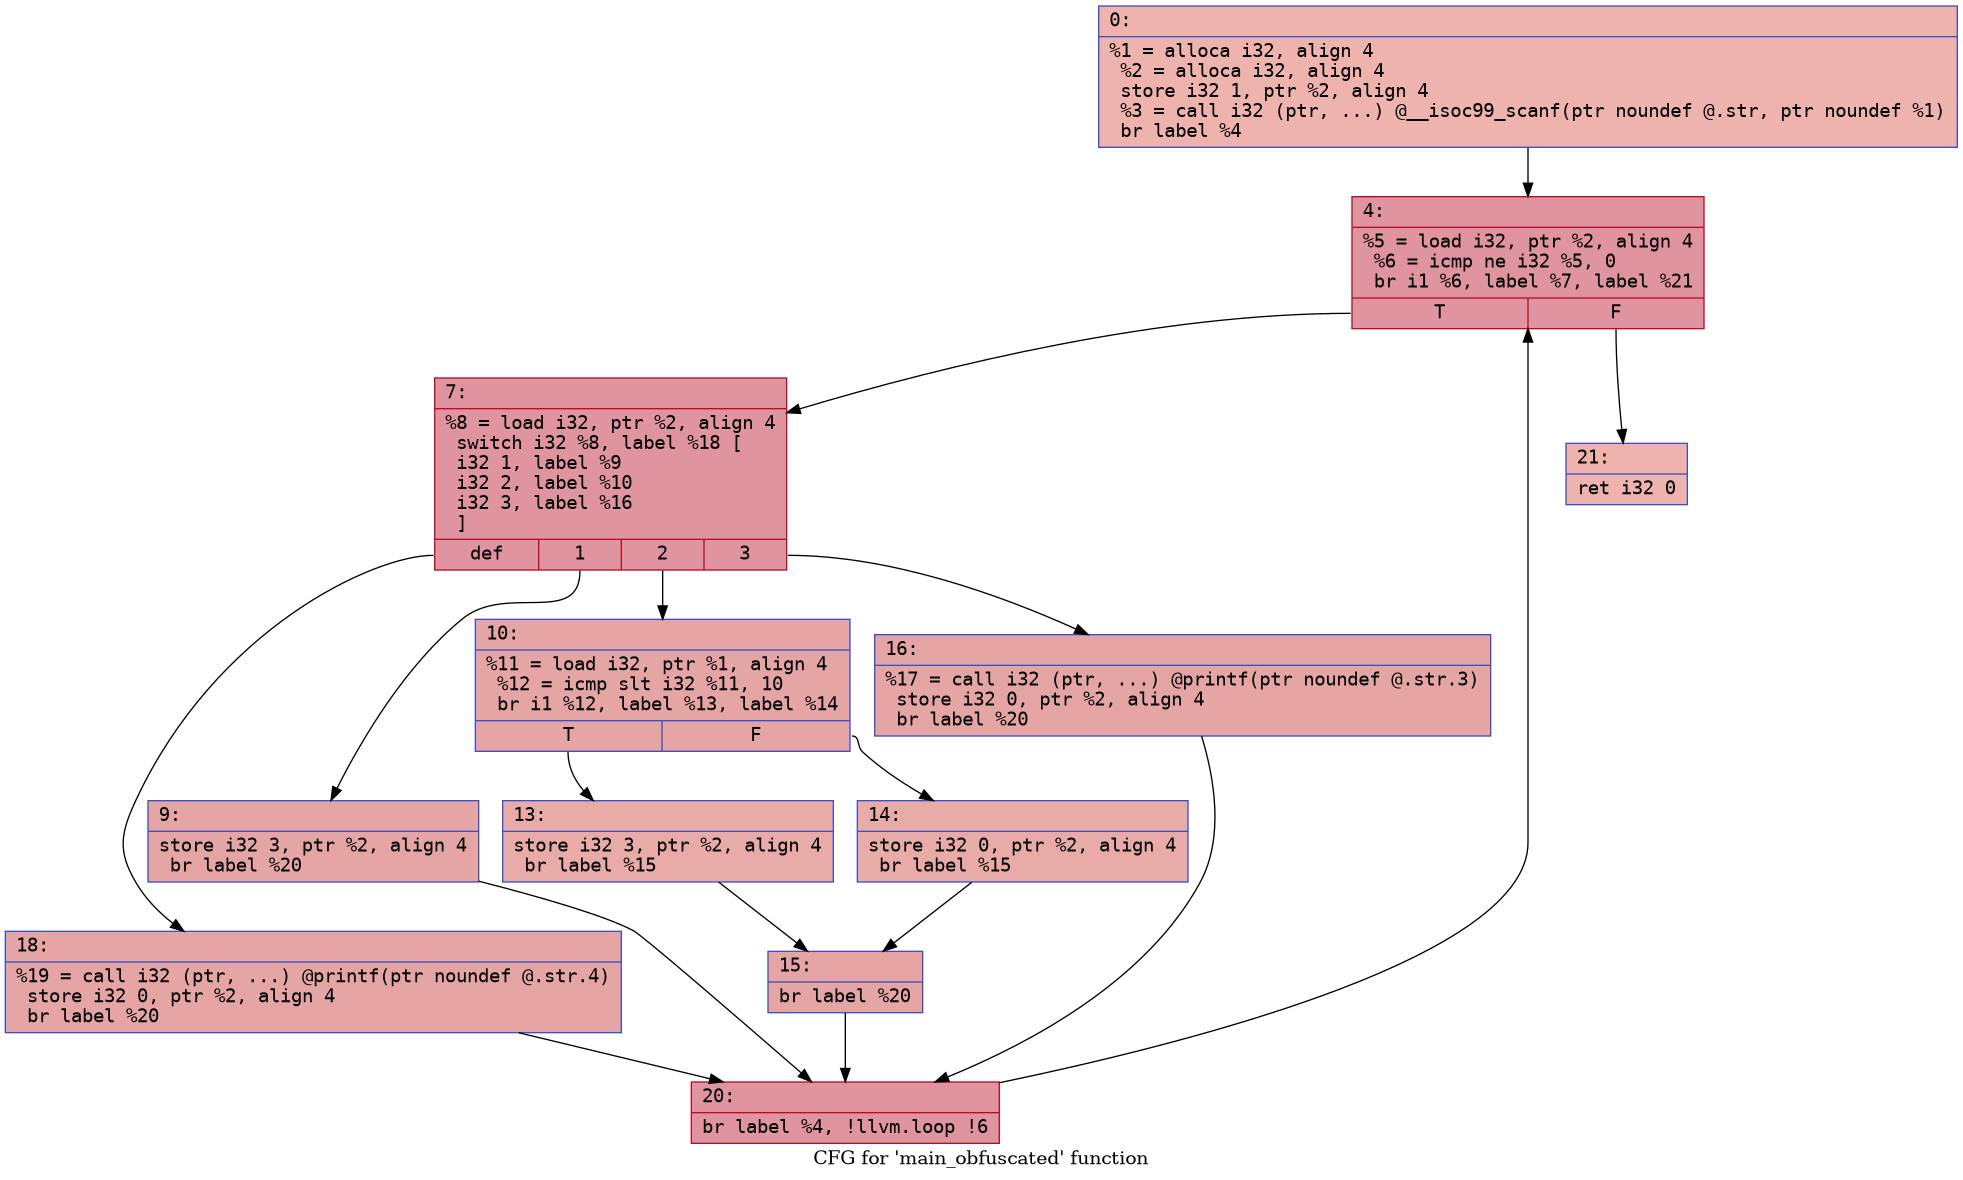
Quite the difference, is it not? We can use a LLVM pass to perform this transformation for us!
Note: We will be generating CFG to visualize our results
later on. You can also take a look at the mentioned paper to see some
more examples
Writing the Pass
Let us start with some boilerplate code
1 | |
The main functionality is in flattenFunction(F) which
takes a function to flatten as an input. (Very briefly, a Module is a
collection of Functions. Functions in turn contain BasicBlocks which in
turn contain Instructions). Here is how the
flattenFunction(F) works
1 | |
The helper function checkIsConditional is simply
1 | |
Now let us move on to the most important function.
flatten_conditional is responsible for taking all the
blocks that end with a conditional jump and applying the flattening
algorithm to them. Here is how it works.
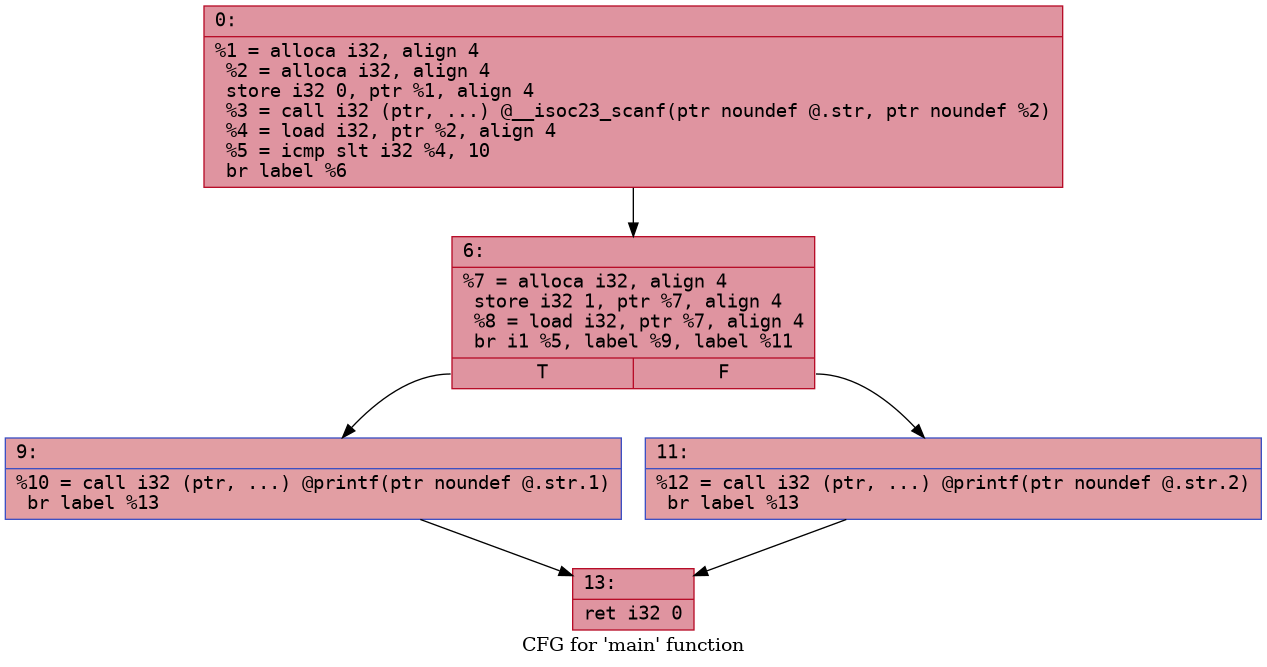
First we want to split the entry blocks into two blocks. This is done
using splitBasicBlockBefore which creates a new block and
inserts it before the specified block. All instructions before the
specified instructions are moved to this new block and all instructions
including the specified instruction and after it remain in the original
block. We will then insert a few instructions in the original block to
store and load the dispatch variable.
1 | |
Here is a visual representation of what we have done

Continuing with
1 | |
This sets up the while(dispatch) loop by jumping to the
falseBlock whenever switch_var is equal to
zero.
Lets start constructing a block for switch and
switch cases now.
1 | |
Lets take a look at what we have done here 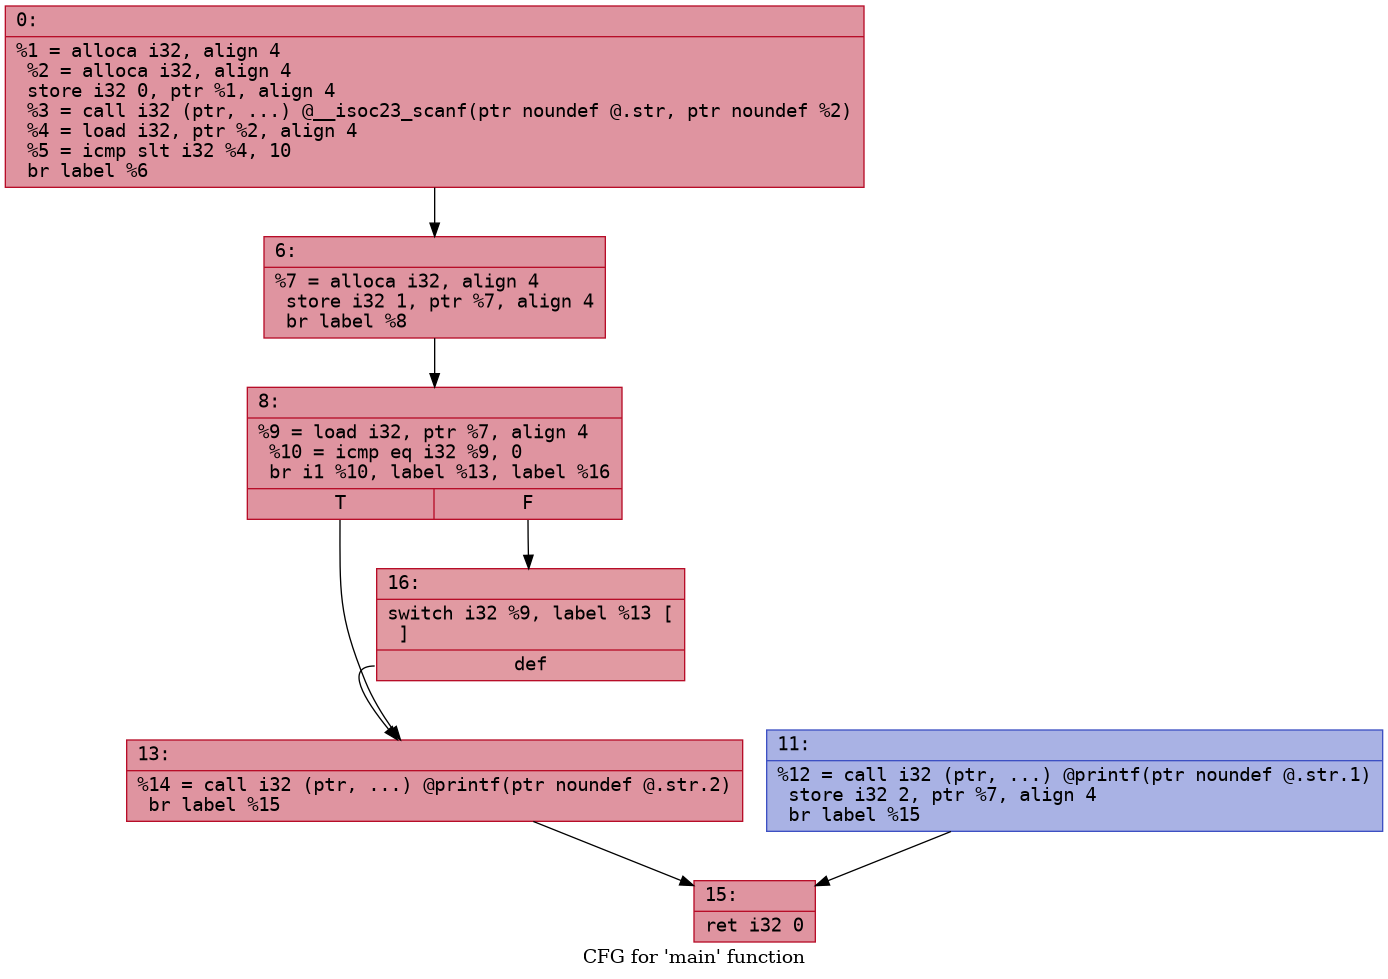 Looks good! The
default is jumping to the false block i.e
 printf("bye")
Although we don't have any loops in our example, but if we did, we
would notice that the loops are still pointing back to Block 6. This
would cause the StoreInst to store 1 in the
dispatch variable and hence only case:1 will be executed.
We need to update the predecessors of Block 6 to instead
point to Block 8.
1 | |
We can now create the case 2 and case 1 as
follows
1 | |
Here is how that looks. See if you can identify all the blocks we
have just added. 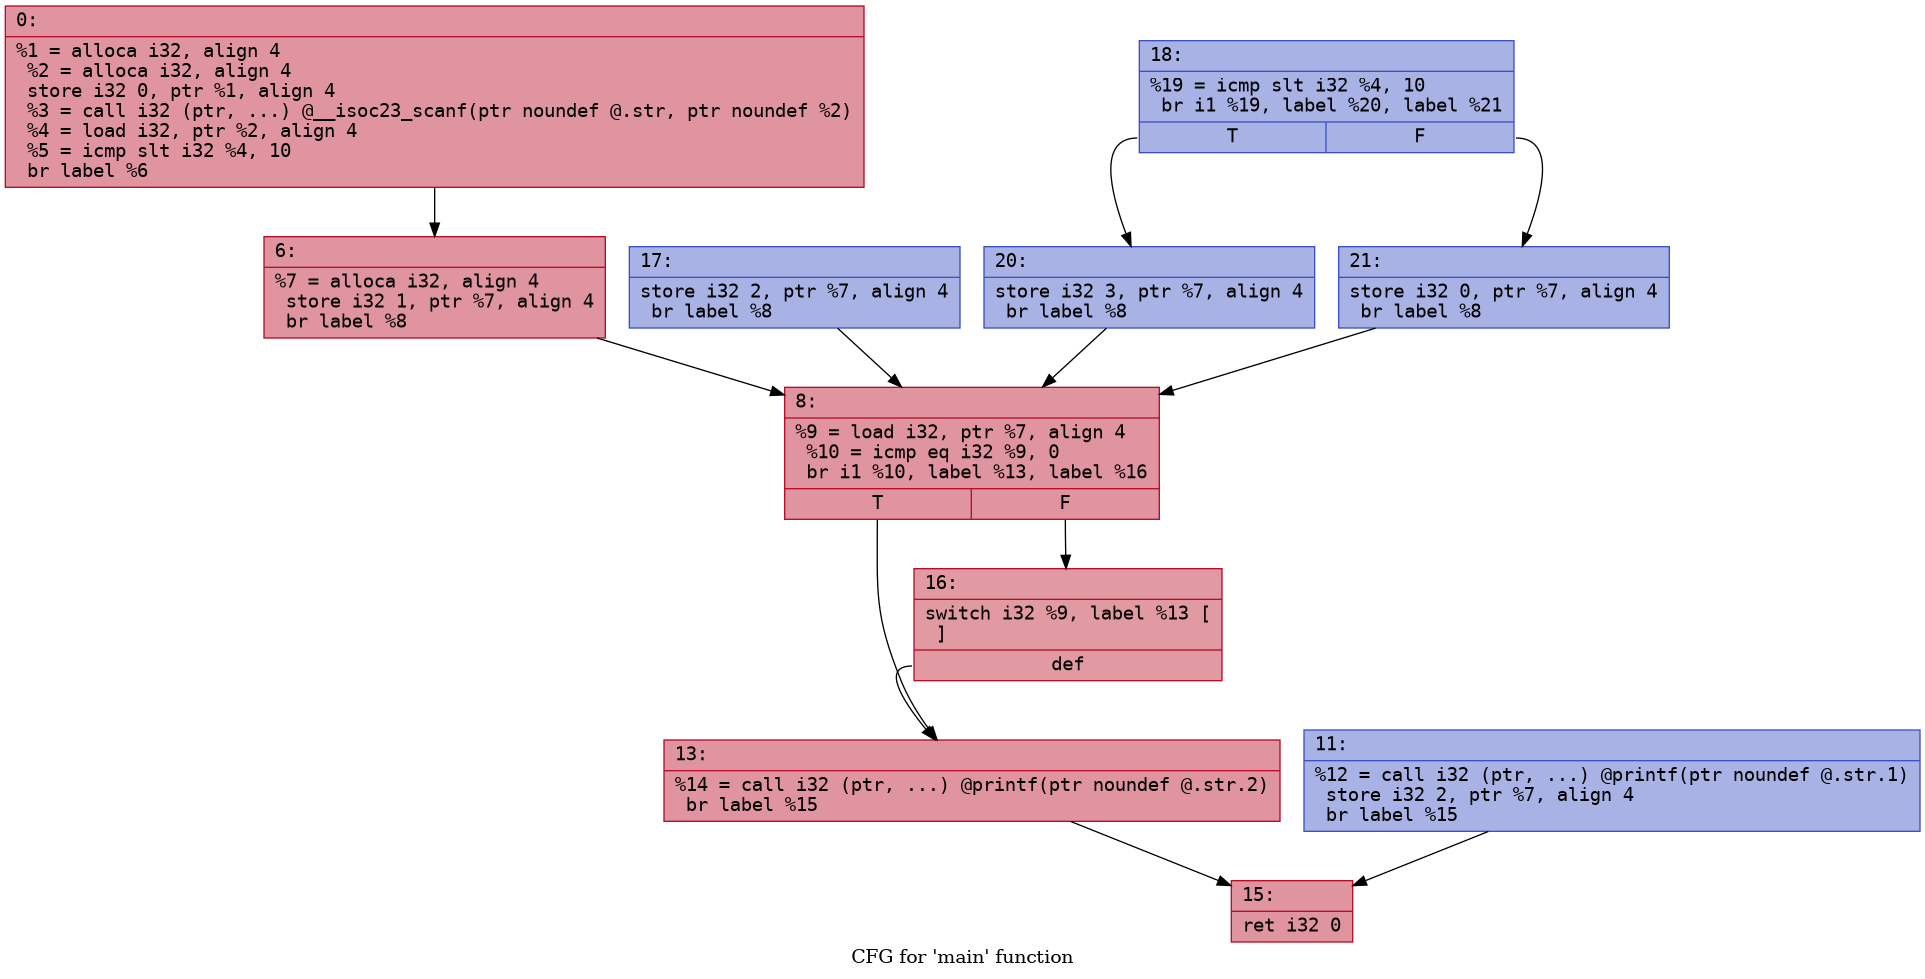
And we are at the final step! All that remains is to add these three switch cases to the switch statement as follows
1 | |
The final result looks like this 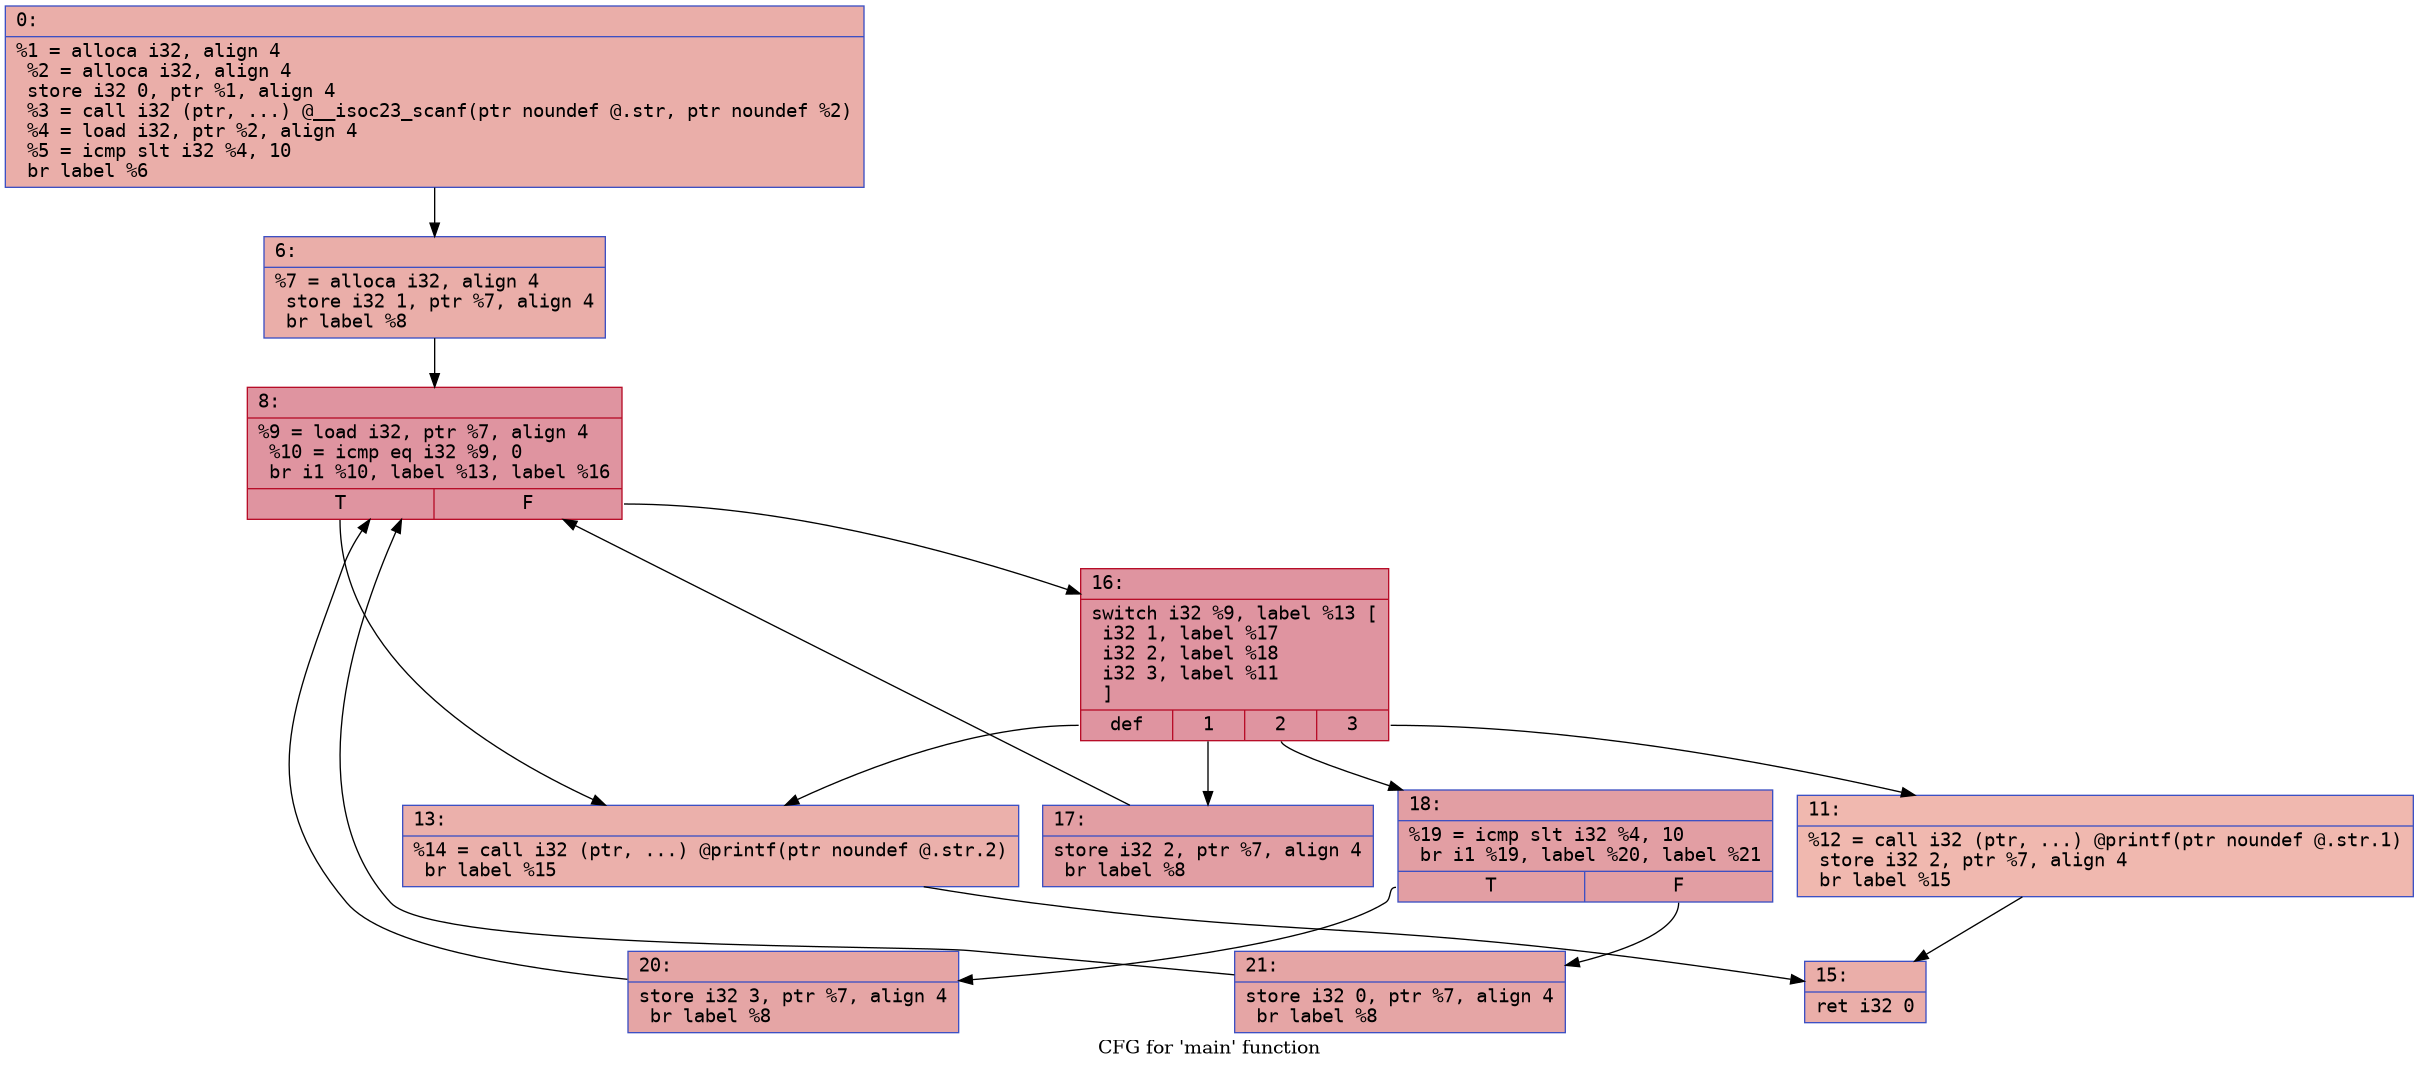 That's it! We have implemented a simple control
flow flattening algorithm using a LLVM pass.
Results
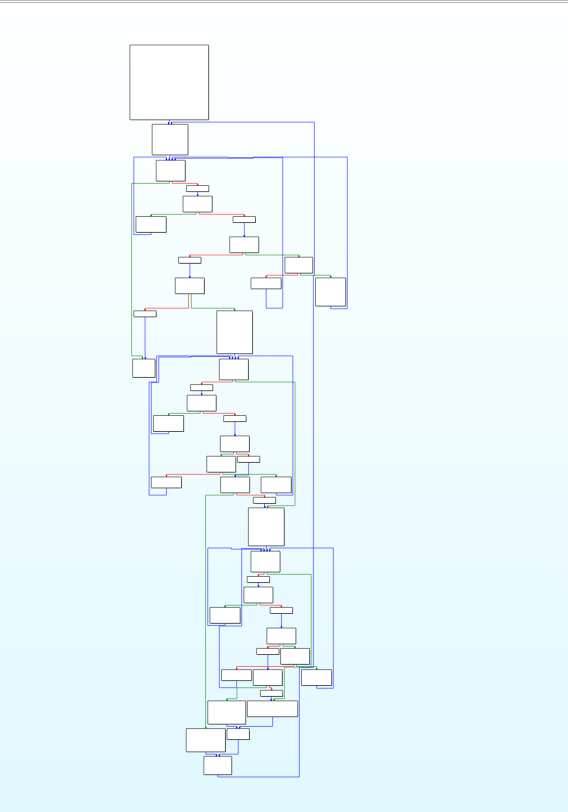
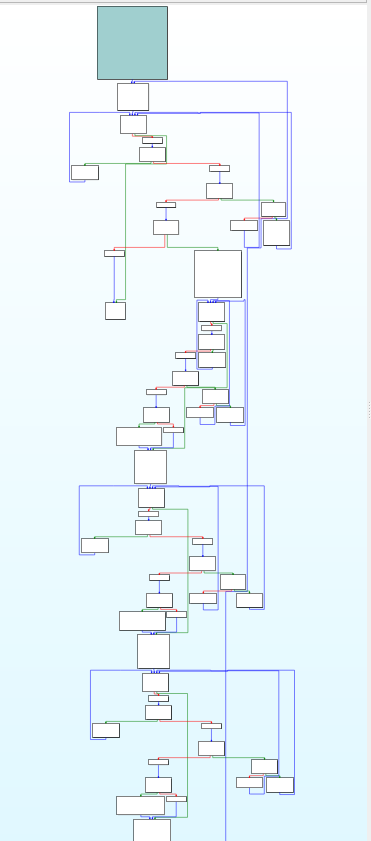
Let us obfuscate and decompile some simple programs using
Ida and see how they look like
Code:
1 | |
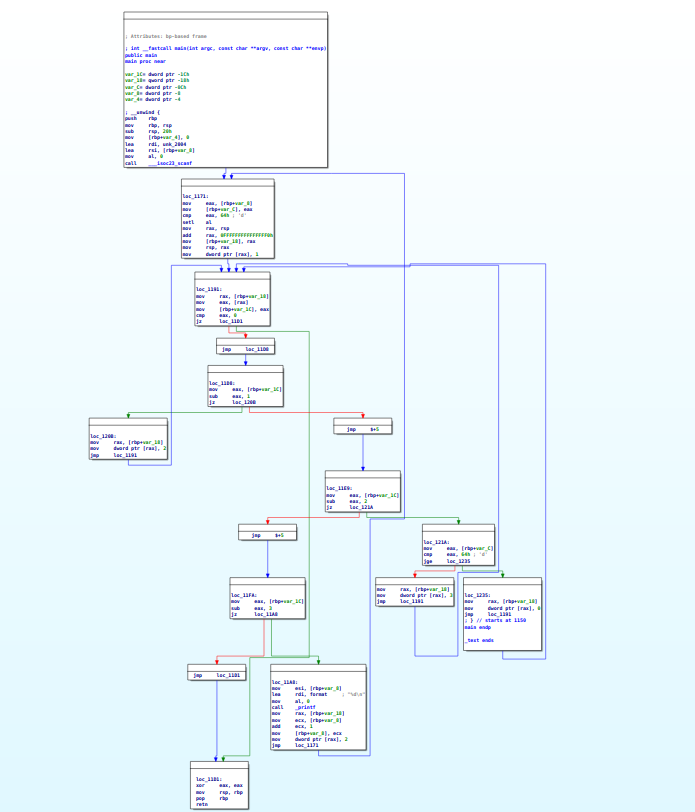
Code:
1 | |
Code:
1 | |
Conclusion
The complexity of the control flow increases non-linearly with the
number of conditionals and control structures. This pass effectively
obfuscates for, while, if-else,
and if-if blocks. While it doesn't directly handle switch
statements, I've included a complementary pass in the GitHub repo that
converts switch statements to if-else chains, which can be
run before the flatten.so pass.
In the end, we've seen how a relatively simple LLVM pass (~100 lines of code) can significantly complicate control flow analysis, even for basic loops. To make any meaningful analysis possible, we would need to reverse the obfuscation algorithm and reconstruct a viable control flow graph - no small task.
The code for this project is available in my GitHub repo. Stay tuned for the next post in this series where we'll explore more LLVM-based obfuscation techniques!
References
Learning LLVM part 1 by 0xSh4dy